Mixpanel
Connect Mixpanel to Customerscore to sync product analytics events and map them to customers in your account.
How to Connect Mixpanel to Customerscore
Connecting Mixpanel is a guided flow with two parts: first you upload the Service Account credentials, then you configure how Mixpanel data maps to customers in Customerscore (customer identification, events to track, and which Users should be synced as Contacts).
Step 1: Prepare Mixpanel API Access
-
Log in to your Mixpanel account. We'll need the project ID from your account URL (e.g.,
https://eu.mixpanel.com/project/12345— in this case,12345is the project ID). -
Navigate to Settings → Organization Settings → Service accounts and click the Add Service Account button in the top-right corner.
-
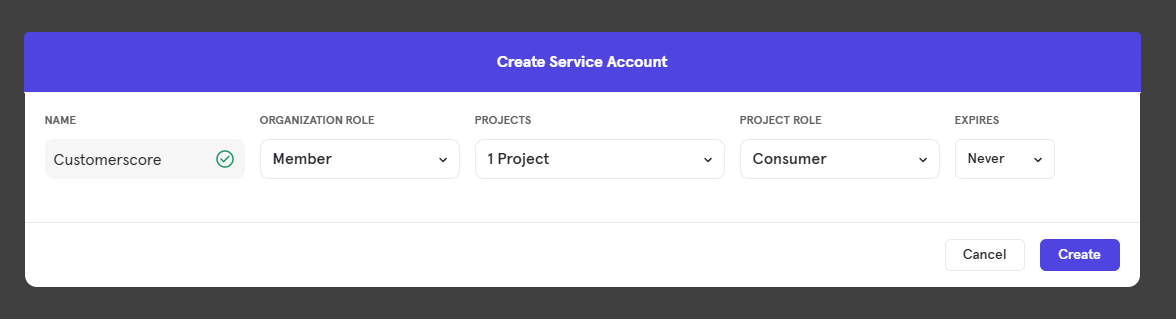
In the form enter
Customerscoreas the Name, set the Organization Role toMember, select your Project, set the Project Role toConsumer, and set Expires toNever. Click the Create button at the bottom of the form to create a service account. -
Copy the Username and Secret that Mixpanel displays — the secret is shown only once.
Step 2: Upload Credentials to Customerscore
In Customerscore, go to Settings → Providers (opens in a new tab) and click Connect to Mixpanel. Fill out the form:
| Field | Description |
|---|---|
| Service Account Username | The username generated when you created the service account. |
| Service Account Secret | The secret shown once at service account creation. |
| Project ID | The numeric project ID from your Mixpanel URL. |
After the credentials are accepted, the integration moves on to a three-step configuration wizard. You can leave and return later — the wizard will resume where you left off.
Step 3: Customer Identification
This step tells Customerscore how your customers (companies) are represented in Mixpanel, so we can match incoming events to the right customer.
Choose one of the options:
- User property — each Mixpanel User has a property that stores the customer identifier (for example
company_id,organization_id, oraccount_id). Select this option when your tracking code sets a company-level identifier on every User. - I'm not sure — you don't track Customers/Companies in Mixpanel, or you're unsure about the setup. Selecting this option prompts you to contact support so we can help you figure out the right configuration before continuing.
If you pick User property, a second field appears: Which User property stores the customer identifier?. Start typing the property name — the dropdown loads existing User properties from your Mixpanel project, and you can either pick one or type a custom name.
Only Users that have this property set will be synced to Customerscore. Users without the external ID cannot be attached to a customer record.
Click Next to continue.
Step 4: Events to Track
Pick which Mixpanel events you want to sync into Customerscore. Only selected events are imported — everything else is ignored.
- The wizard lists all event definitions found in your Mixpanel project, along with the total count (e.g. "We found 42 events in your project.").
- Use the search box to filter the list by name.
- Click Select all / Deselect all to toggle everything at once.
- Tick each event you want to track. A counter in the header shows how many are currently selected.
You need to select at least one event to continue. You can always edit this list later by reopening the integration settings.
Click Next to continue.
Step 5: Users Sync
Along with events, Mixpanel Users are synced as Contacts in Customerscore. This step lets you filter which Users should be imported so that only the right data flows into your account.
Locked condition. If you selected a User property for customer identification in Step 3, the wizard automatically adds a non-removable condition {property} is set. This guarantees that only Users that can be attached to a customer are imported.
Adding filter conditions. Click + Add condition to narrow the sync further. Each condition has three parts:
| Part | Description |
|---|---|
| Property | The Mixpanel User property to filter on. Pick from the list or type a custom name. |
| Operator | One of equals, does not equal, is set, is not set, in, not in, >, <, =, <=, >=. |
| Value | The value to match against. The input changes based on the operator (see below). |
The value field adapts to the operator:
is set/is not set— no value needed.in/not in— enter multiple values (type and press enter to add each).- All other operators — a single text value.
Use the trash icon to remove a condition you've added. The locked condition from Step 3 cannot be removed.
Previewing the result. Click Preview users to run the filter against Mixpanel. The wizard shows:
- A badge with the number of Users that will be synced (e.g. "1,248 users will be synced").
- An Example users table (up to five rows and five columns) so you can sanity-check the output.
After you've reviewed the preview, a Save configuration button appears — click it to finish the setup. If you change any filter after previewing, you'll need to run the preview again before saving.
Editing or Disconnecting
You can reopen the Mixpanel integration at any time from Settings → Providers (opens in a new tab) to change the external ID mapping, tracked events, or Users filters — the wizard pre-fills the form with your current configuration.
To remove the integration, click Disconnect from Mixpanel at the bottom of the configuration wizard. This removes all configured metrics and integration settings; existing historical data in Customerscore is preserved.
What Happens Next?
Once the configuration is saved, Customerscore triggers an initial sync immediately and schedules recurring syncs according to your account's sync period. Selected events appear in customer timelines, and Users matching the filter are created as Contacts attached to the right customer via the external ID mapping.